Create awesome custom email signatures in Mail on Apple Mac

Are you making the most of the signature at the end of emails? You can simply add your name, but a proper signature is much better. Here's how to create a great one in Mail on the Mac.
An email always has a From: that contains the sender's email address and sometimes it even contains a proper name. However, this is not an excuse to end an email improperly and not include a signature. This is not a real hand-written signature and at its simplest, it can consist of just your name, but providing additional information, especially with business emails, is beneficial. It may even be mandatory to include some text like a disclaimer or privacy notice if you are emailing from a company email address.
The signature is an essential component of an email message and if none is included, your email may be dismissed or ignored. It simply gives a bad impression.
You may not have realised it, but you can create impressive signatures in the Mail app in macOS on the Apple Mac. A signature will always contain your name, but the rest of the content is up to you.
When a new email message is created, Mail automatically adds the signature at the end of the message to save you having to type it in. You can also switch between signatures if you have more than one and use one for work emails and another when emailing friends or family. It is a great way to save time and effort.
Business vs fun signatures
A signature for a business user might contain information relating to your company, your position, ways to contact you, and perhaps privacy or terms and conditions messages. A personal signature that you use when emailing friends and family could contain some fun elements too.
Mail lets you create multiple signatures and you can have both business and fun ones, and select the one you want to use.
Create an email signature
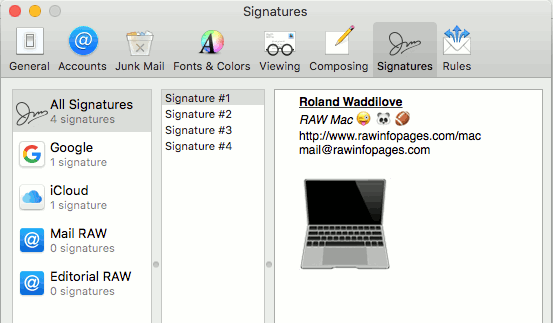
Start Mail and go to the Mail menu, select Preferences and then select the Signatures tab. If you have never created a signature before, select an account on the left and click the plus button at the bottom. Each email account has its own signature.
Click in the right-hand pane and type whatever you want to include at the end of an email. Here is a very simple, but boring example:

Rich text email signatures
What you may not have realised is that the right-hand pane is like a mini rich text editor. Think about how you would use TextEdit without the menus and you'll get the idea.
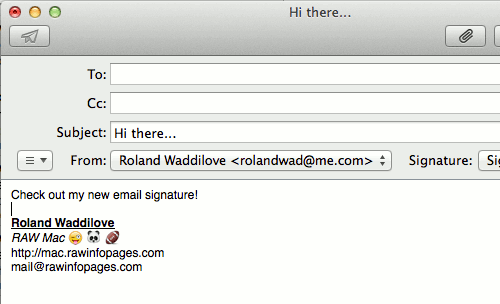
For example, you can select text by clicking and dragging over it with the mouse. You can then use Cmd+B to make it bold, Cmd+I for italic and Cmd+U to underline it. You can mix these styles too, as shown in the top line of the screenshot below, which has both bold and underlined text:

This signature is looking better already, but there is more we can do to make it more exciting and interesting.
Use emoji in email signatures
Click in the signature and then press Ctrl+Cmd+Spacebar. An emoji window pops up! There is a toolbar down at the bottom to select various categories of emoji and a verticalscrollbar on the right to scroll through them. Click any emoji character to insert it into the signature, then press Ctrl+Cmd+Spacebar to insert another.
In the example here, I pressed Command+I to turn off italic after RAW Mac otherwise I would have got an italic Emoji (weird, but true), and then added a couple of characters:

Test your email signature
After creating your custom signature, close the window and click the button in Mail to create a new email message. You'll see the email signature added to the bottom of the message. This looks far better than plain text and you can have a lot of fun creating entertaining signatures to impress your friends.
Notice that the signature includes a link to a website and an email address. You might be tempted to try to turn them into a hyperlink and mailto link. Don't bother because it isn't necessary. When this email is received by someone, the hyperlink and mailto link magically work:
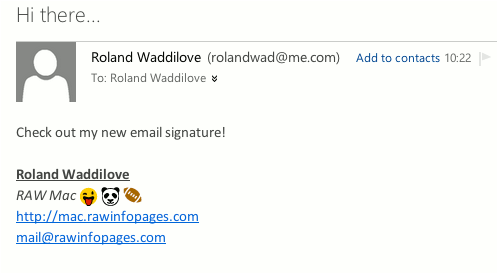
This last screenshot shows an interesting effect and the emoji characters in the received email aren't exactly the same as those sent. Unlike fonts where Times New Roman or Arial is the same on every computer and program, it appears that there isn't a standard for emoji. They are similar across devices and operating systems, but not 100% identical.
The screenshot of the email above was taken in Google Chrome. It's running on a Mac, but it appears to be using its own Emoji character set rather than the one in macOS. The differences are quite minor though. Compare the smiley face and panda in the previous two screenshots, and the football tilts in different ways. It's not a big deal though.
Change the font size
There are no obvious controls to change the size of the text in an email signature, but remember that this is a rich text editor just like TextEdit. Select some text in your email signature and then use the keyboard shortcuts you would use in TextEdit to increase and decrease the font size. Press Cmd and either the plus or minus keys on the keyboard. It even works with emojis.
Press Cmd+space to show the emoji selector. I found one that looks like an Apple MacBook. Clicking an emoji inserts it at the default font size in the signature. Select the emoji and keep tapping Cmd and the plus key to increase the size. This is not a photo, it is simply an emoji with a very large font size.
Fonts and colors in signatures
There is no obvious way to select which font to use for a signature. Where is the formatting menu or toolbar? As before, think about what you would do in TextEdit. For example, to show the font selector in TextEdit without using the menu, you would use the keyboard shortcut Cmd+T. When creating a email signature, it works! Select some text, press Cmd+T and choose whatever font you want to use.

Just a word of caution here: Use a common font, if you use a fancy font that does not exist on the email recipient's computer or phone, the text will appear in some other font, probably the default font.
The colour of the text can be set in a similar manner. Select some text in the email signature and press Shift+Cmd+C to open the color picker system gadget. Select one of the tabs and then choose a color. Unlike fonts, colors are universal, so there is no problem.
You can have a lot of fun with things like this. Experiment and see what else you can do!
Just one email signature was created here, but if you have more than one email account it is possible to create a different signature for each one. Just select the account at the start.
Related articles: