
Do the DNS servers you usewith the internet protect you from malware, phishing and bad websites? It can, if you switch to an alternative DNS provider like CleanBrowsing. Here’s how to use it.
Are you using the default DNS settings provided by your internet provider? If you don’t know what I am talking about, you probably are. You should consider switching to an alternative DNS provider for better privacy, speed and security.
Some popular DNS alternatives include Cloudflare, Google, OpenDNS, NextDNS, and CleanBrowsing. I have used all of those at some point, but here I will take a closer look at CleanBrowsing.
All of these providers have free options, so a safer, more private and faster internet is available to everyone.
For those that don’t know what DNS is, the Domain Name System basically turns the domain names we assign to websites like wikipedia.org into IP addresses that are used by computers on the internet. A DNS server tells a web browser where to find a website. Although it is possible to connect to websites without one, it is much easier to remember and use domain names than meaningless numbers.
Every internet service provider provides a DNS server and it is used by all computers and devices that connect to the internet. Unless you specify an alternative, that is. You don’t have to use the the internet provider’s DNS. Alternative DNS servers can be used and they offer extra features, speed, security and privacy.
Let’s see how to use CleanBrowsing.org DNS servers on Windows PC and Apple Mac computers.
Related: How to stop Microsoft Edge spying on Chrome browsing data
Enable CleanBrowsing DNS in Chrome and Edge
You should not use any old DNS servers you find on the web. The server, and whoever runs it, can see every website you connect to, so only use trustworthy providers that you know are safe. So which DNS servers are safe?
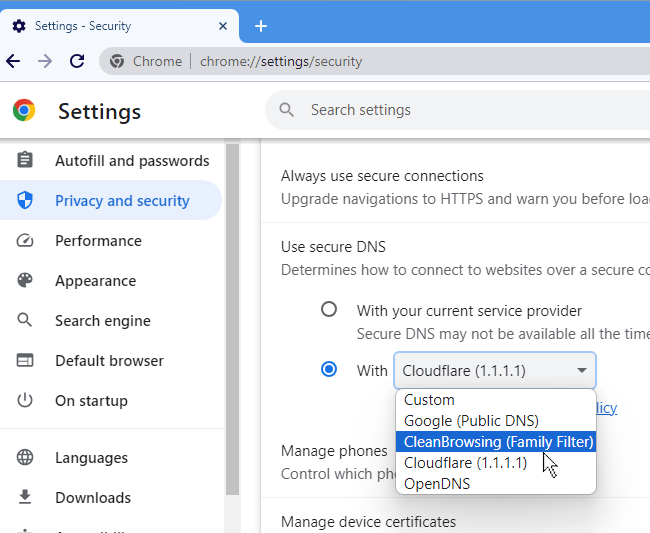
In Chrome browser, click the three dots in the top right corner to open the menu and select Settings. Select Privacy and security in the sidebar and then click Security on the right. Look for the Use secure DNS section and select With. Click the menu and a list of safe DNS providers appears. CleanBrowsing (Family Filter) is one of the options. It is Google-recommended.
This offers security, privacy, protection from malware, and porn. It is a good choice for a family or child’s computer. It is just one of three DNS options from CleanBrowsing and we will see the others shortly.
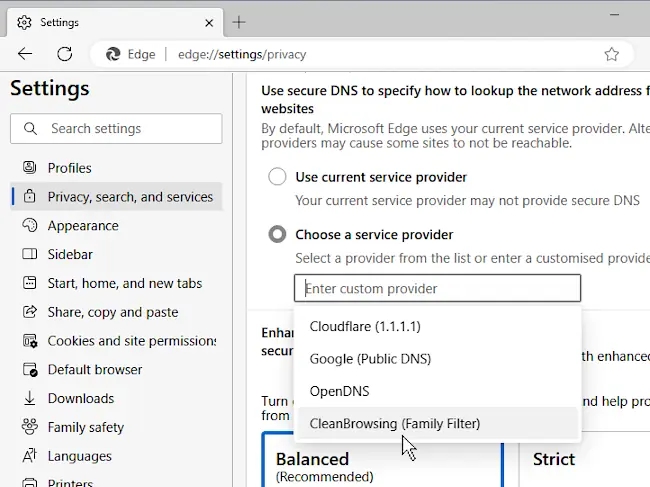
In Edge browser, click he three dots in the top right corner to open the menu and select Settings. Click Privacy, Search and services in the sidebar, and then scroll to the Use secure DNS… section. Select Choose a service provider and click the box to see a list of DNS servers. CleanBrowsing (Family Filter) is one of the options. It is Microsoft-recommended.
After selecting CleanBrowsing, you will not notice anything different. However, you are being protected and you can confirm this by going to an adult website. DNS is disabled for adult content and you see nothing. The same happens for malware, known phishing sites and so on.
Manually set up CleanBrowsing DNS
We have seen how to configure Chrome and Edge browsers to use CleanBrowsing DNS servers for privacy, speed and security, but this is very limited. Firstly, only the Family Protection option is available. There are alternative CleanBrowsing DNS servers that provide security without blocking adult content, and there are DNS servers that provide partial adult content blocking (a VPN will bypass the filter for those that want that sort of thing).
Another limitation of in-browser DNS settings is that protection is limited to the browser. Email, apps and other software that accesses the internet is not protected by browser settings. Set the DNS servers at the operating system level and everything that accesses the internet is protected. Browsers, email, apps and so on.
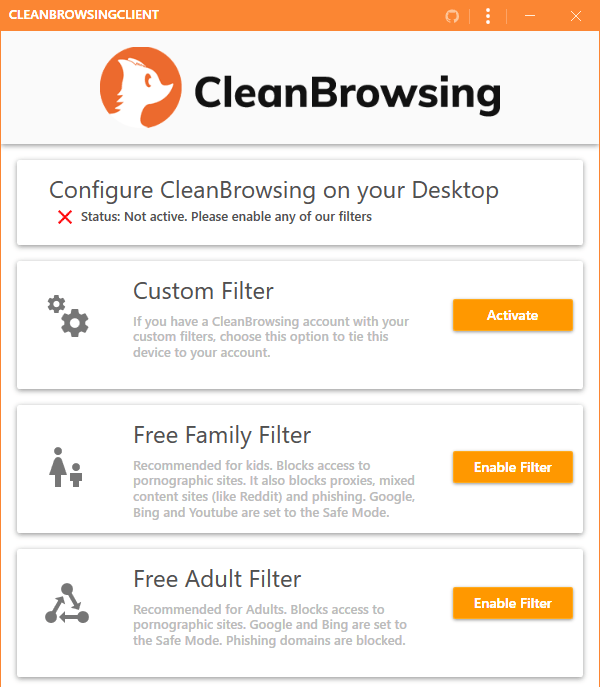
Go to the CleanBrowsing website and all the information you need to configure Windows, macOS, Linux, iOS and Android is provided. There are apps to download which make changing DNS settings easier, but it is useful to learn how to do this manually yourself and that is what we will do here.
Browser settings override system settings, so undo any changes to Chrome or Edge DNS and set it to use the defults - use current service provider in the first two screenshots above. Then we can set the current provider at the OS level.
Different versions of the OS do things slightly differently, so if you are not running the latest, your menus might be different to mine. Here is Windows 11 and macOS 14.
Configure DNS servers in macOS
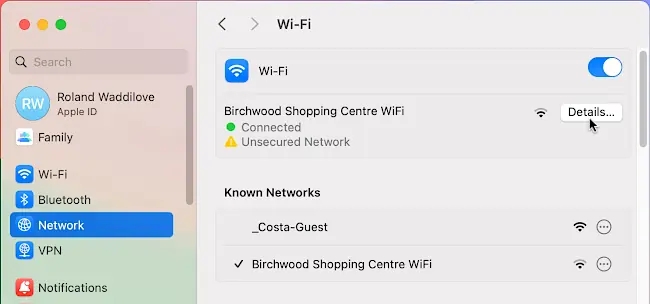
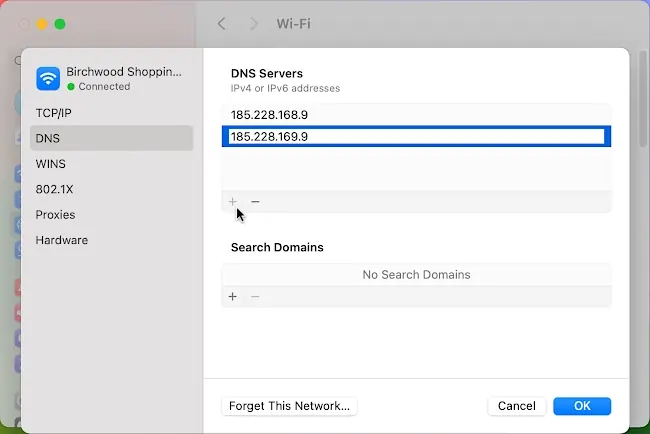
Open System Settings on the Mac and click Network in the sidebar. The current Wi-Fi network is displayed at the top. Click the Details button and in the window that pops up, select DNS in the sidebar. Select each of the current DNS servers, which usually come as a pair, and then enter the DNS servers for CleanBrowsing.
Enter the DNS servers from the CleanBrowsing website, for example:
- 185.228.168.9 and 185.228.169.9 for security only.
- 185.228.168.168 and 185.228.169.168 for the family filter.
- 185.228.168.10 and 185.228.169.11 for the adult filter with VPN bypass.
There are also IPv6 DNS details at the CleanBrowsing website and these can be added too, although not all Wi-Fi networks need it, and some don’t support it.
Configure DNS servers in Windows
The same DNS addresses are used on Windows PCs and the only difference is where there are entered. Press Windows+I to open the Settings app and select Network & internet in the sidebar. Click WiFi (not the switch), and then click the current Wi-Fi network to access DNS and other settings.
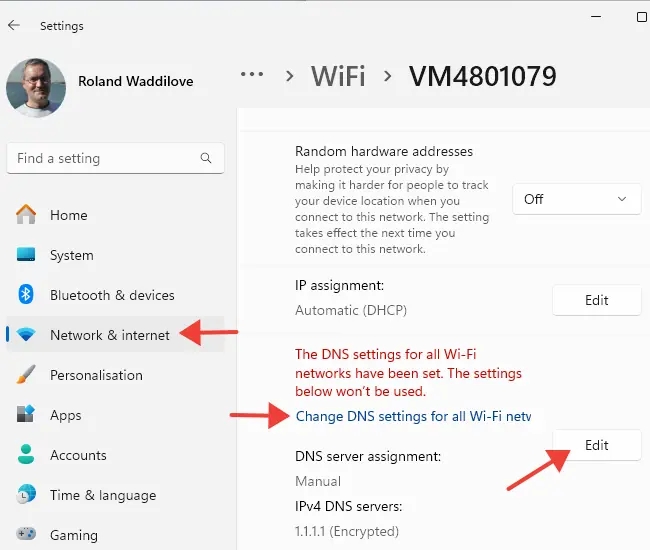
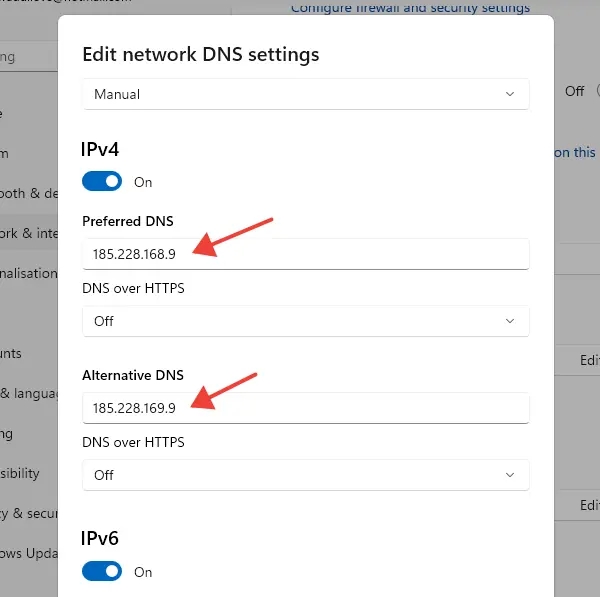
A little way down is DNS server assignment. Click the Edit button and enter the DNS server IP addresses from the CleanBrowsing site.
You may or may not have a link, Change DNS settings for all Wi-Fi networks. Click it if you do and click Edit in the DNS server assignment section.

IPv4 DNS server addresses are essential, but IPv6 addresses may not be needed and some Wi-Fi networks do not support them.
I changed the DNS servers in both places to the same CleanBrowsing addresses. You should not need to restart the computer for the new DNS servers to be used, but I always do just to make sure.
Undo DNS server changes
How do you undo the changes to the DNS server addresses? I am not sure why you would want to because alternatives are usually better than the internet provider’s default, but simply deleting the current DNS addresses on the Mac or PC is sufficient. When nothing is set, the internet provider’s are used.

Leave a Reply