
New features in the Windows Photos app enable you to blur photo backgrounds, remove them, or replace them. Could this be your go-to tool for manipulating photo backgrounds? Here’s how it works.
AI tools are popping up everywhere, and they are boosting the features of all kinds of apps. Photo editing didn’t change much for years, and then all of a sudden, apps were gaining very clever tools that made difficult tasks easy.
Windows Photos has gained a couple of interesting features, and I recently looked at Erase unwanted objects from photos with Windows Photos AI tool. In this article, I will look at the background tool and how it can be used to manipulate photo backgrounds.
To access this tool, open the Windows Photos app from the Start menu and then open a photograph or double-click a JPEG image in Explorer. (Sometimes other apps take over the file association.)
Blur the background of a photo
Sometimes the background in photos is unnecessary and distracting. This is often the case with portrait photographs. There are camera techniques that can be used to blur the background to make the subject stand out from it, like setting the aperture to give a shallow depth of field. However, many people simply point and shoot with their phone. Typically, the background is distracting. It can be blurred afterward in Windows Photos though.
Click the first icon in the Photos app toolbar to enter edit mode and access the tools that are available. Click the last icon in the toolbar to access the background tool.

There are three image thumbnails. Click the first to access the blur tool. There is no need to select the background in the photo, and there is no need to select the subject. Whether it is a person or a pet, the AI in Windows Photos can tell the background from the subject.
Use the slider to set the amount of background blurring. If you need to blur it more, you must click the Save options button, save it, then open it again in the background blur tool. I found this an irritation because I often wanted a bit more blur than it provided.
Remove the background of a photo
Select the Remove thumbnail, and the background of the photo is made transparent. You could then use this image elsewhere, such as pasting it into another photo.

You may have noticed the background brush tool. It is for modifying the area selected as the background in case the automatic selection is not right. This works with the Blur, Remove and Replace functions. Select Background brush tool and there are Add and Suubtract buttons and a Brush size slider.

If the automatic selection of the background has selected too much or missed a bit, click Add or Subtract, set the brush size, and click on the image to modify the selection.
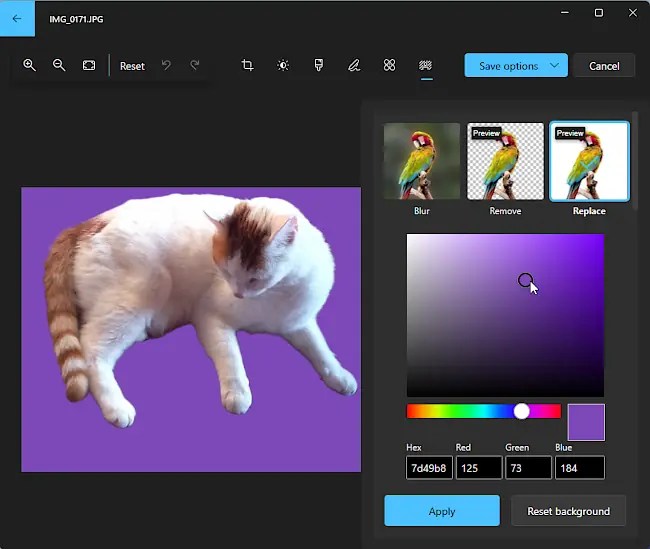
Replace the background of a photo
Select the Replace thumbnail, and the background of the photo can be replaced with a solid color selected from the color palette displayed. I would have liked to be able to replace the background with another image, but if it has that feature, I could not find it. In this version of the Photos app, it seems to only replace the background with a solid color.
Background removal is becoming a common feature in photo editing apps, and it is even in Microsoft Paint. I wrote about it in Erase the background in Microsoft Paint, replace it with another. Now, you don’t even need to leave the Windows Photos app to apply background effects. While browsing your photos, you can easily add background effects to an image. Always save the image as a copy, and never overwrite the original; you might need it for something else.
